Tutorial: Custom Eye Colours using Photoshop (Beyond just Recolouring)
I've gotten quite a few compliments on my custom eye colours, so I thought I would post a tutorial showing the technique I use.
Edit by Tiggerypum: If you have Paint Shop Pro - check out the instructions in this message in the thread: psp tips here
You can get decent results by simply recolouring the Maxis default colours, but I find that I can get much more interesting and unique shades by starting from scratch. For this tutorial I will be assuming that you already know how to export and import files from Bodyshop. If you don't, there are numerous other tutorials that cover that same ground. I will also be assuming that you have a basic working knowledge of Photoshop. Feel free to ask if you have any questions.
I used Photoshop CE for this tutorial, but from what I remember of earlier versions, it should work unless you're using a very old version of Photoshop.
I will admit that this looks like a LOT of steps, but once you have it down it only takes about two minutes total (Mere seconds if you save the steps as an Action.), and the results are worth it.
In Photoshop, create a new document, 96 pixels in height and 36 pixels in width.
Zoom in to about 400% so that you can see what you're doing.
Create a new layer, and delete the background to get rid of the locked background layer, if necessary.
If the colour chooser isn't open, go to Windows ---> Color to open it. Click on the swatches tab.
Pick a grouping of four similar colours, ranging from darkest to lightest. The further apart the colours are in shade, the more detail you will have in the finished eye.
Using the rectangular shape tool, fill the layer with the darkest colour. Switch to the next lightest colour, and make a rectangle vertically down the centre of the layer, leaving approximately five pixels of the first colour showing on either side.
Repeat this until you have used all four colours. The result should look something like this:

(Picture enlarged for sake of clarity.)
The important thing is to have the darkest colours on the outside, with the lightest colour in the centre. Otherwise this won't work.
Go to: Filter ---> Stylize ---> Wind
Set the Method to Wind and the Direction to From The Right. Click OK.
Do it again, only this time set the direction to the left.
Go to: Image ---> Adjustments ---> Invert
Repeat the wind filter from both the left and right directions.
Invert the image to get your original colours back.
It should now look something like this:

Using the rectangular marquee tool, select an area on the right side of the canvas approximately five pixels wide.
Go to: Select ---> Feather
Set the feather radius to 5 pixels and click OK.
Go to: Image ---> Adjustments ---> Brightness/Contrast
Turn the Brightness all the way down (Or whatever looks right for the colours you've chosen. Darker colours might only need the slider halfway down.) and click OK.
Repeat the previous steps on the left side of the canvas.
Go to: Image ---> Canvas Size
Change the canvas width to 48 pixels and set the anchor point to the centre right.

Using the Rectangle Shape tool, fill the transparent part of the canvas on the left with black. This will be the pupil.
Go to: Image ---> Canvas Size
Change the canvas width to 96 pixels and set the anchor point to the centre left.

Go to: Image ---> Rotate Canvas ---> 90 Degrees CW
IMPORTANT: Make sure you only have one layer! If there's more than one, Go to: Layer ---> Merge Visible
Go to: Filter ---> Distort ---> Polar Coordinates
Choose the Rectangular to Polar option and click OK.
You should now have a fairly decent looking eye.


(This pic actual size.)
To tweak it a bit, you might want to duplicate the layer, and change the blending mode. On lighter colours, Overlay works quite well, on darker colours Color Dodge will brighten it up. Just play around with it a bit and see what works best for the colours you've chosen. When you're done, merge the layers.
Now, one last step.
Go to: Filter ---> Render ---> Lens Flare
Position the flare somewhere in the upper right part of the iris, and play with the sliders until it looks how you want it.
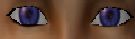
And you're done. Just copy the eye, paste it into the file you exported from Bodyshop, and position over the original eye. It should fit exactly, if you have used the dimensions specified in this tutorial. Flatten the image and save.
By using different colours and experimenting with layer styles, you can get many different results.
Advanced users: It's well worth the time to save the steps as an Action. Then you can make a dozen or so colour bar sets, run an automated batch, and just pick the ones that look especially nice for further editing.
EDIT 7/20/05: Check out post #14 in this thread for some interesting variations!
 Sign in to Mod The Sims
 13th Apr 2005 at 8:42 AM
Last edited by tiggerypum : 4th Sep 2007 at 12:01 AM.
Reason: added psp info
13th Apr 2005 at 8:42 AM
Last edited by tiggerypum : 4th Sep 2007 at 12:01 AM.
Reason: added psp info